
In this lesson, we will begin our introduction to pygame, the python library that we will use to write games. In particular, we will learn how to write a program which makes a simple image appear to be bouncing around inside a program window. Before we tackle graphical programs, let us have a look at the following simple python program:
  1 import sys
  2
  3 while True:
  4     word = raw_input("Type the letter 'q' to quit: ")
  5     print "You typed: ", word
  6     if word == 'q':
  7         sys.exit()
By now, you should be able to understand the above program. The python idiom
while True:
(sometimes written while 1: )
sets up an infinite loop. This loop, and the main program, is terminated when the condition expressed on line 6 is satisfied.
Let us consider the corresponding example in pygame:
  1 import sys
  2 import pygame
  3
  4 pygame.init()
  5 pygame.display.set_mode((320, 200))
  6
  7 while True:
  8     for event in pygame.event.get():
  9        if event.type == pygame.QUIT:
 10            sys.exit()
After importing the pygame module (line 2), we initialise it (line 4) and create a window 320 pixels wide and 200 pixels high (line 5; the width and height are elements of a tuple). Line 8 is the pygame equivalent of line 4 of the previous program with an important difference: rather than prompting for a specific user input, pygame is constantly waiting for events (such as keys being pressed, mouse being clicked, etc.). Line 9 tests to see if the "close window" button has been pressed, signaling the end of the program.
Before going any further, let's make the code a bit more flexible by removing hard-coded values in the set_mode() call, adding a few variables for future reference as well as choosing our own name for the program window; the lines that have been changed are indicated by a red line number in the listing below.
  1 import sys
  2 import pygame
  3
  4 pygame.init()
  5
  6 size = width, height = 320, 200
  7 screen = pygame.display.set_mode(size)
  8 window_title = "My game"
  9 pygame.display.set_caption(window_title)
 10
 11 while True:
 12     for event in pygame.event.get():
 13        if event.type == pygame.QUIT:
 14            sys.exit()
The next step is to add an image to our display. The image we have chosen has a yellow background and a blue outline as indicated below.
We first load the image (named "smilie", line 11 below) and determine its characteristics (size, etc., as denoted by "smilie_rect" on line 12) using the get_rect() method. Take good note of this as rectangles are very important in pygame.
  1 import sys
  2 import pygame
  3
  4 pygame.init()
  5
  6 size = width, height = 320, 200
  7 screen = pygame.display.set_mode(size)
  8 window_title = "My game"
  9 pygame.display.set_caption(window_title)
 10
 11 smilie = pygame.image.load("smilie.bmp")
 12 smilie_rect = smilie.get_rect()
The other changes are inside the while loop, and will therefore be repeated many times until the program terminates ... even though nothing will change.
On line 20, we blit the smilie image on the screen. The word blit comes from bit block transfer and simply means that we copy pixels from an image ("smilie") onto another one ("screen"), at a given location. This operation is done in computer memory on a copy of the image displayed on the computer screen.
On line 21, we update the computer screen by "flipping" the image in the computer memory onto the screen.
 13
 14 while True:
 15     for event in pygame.event.get():
 16        if event.type == pygame.QUIT:
 17            sys.exit()
 18
 19     # update image
 20     screen.blit(smilie, smilie_rect)
 21     pygame.display.flip()
Try it by yourself and make sure that it works as described.
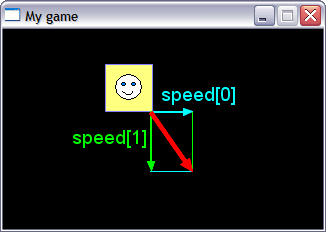
We are now ready to consider a moving image rather than a stationary one. We need to specify a "speed" of motion, which is a list of two values as specified on line 13, the first value (speed[0] = 20) being a number of pixels in the horizontal direction and the second value (speed[1] = 10) is a number of pixels in the vertical direction
...
 11 smilie = pygame.image.load("smilie.bmp")
 12 smilie_rect = smilie.get_rect()
 13 speed = [20, 10]
The speed values will be used to move the image as illustrated below, with increasing horizontal values towards the right of the screen, and increasing vertical values towards the bottom of the screen.
The other changes are inside the while loop, and will therefore be repeated many times until the program terminates; this time, things will change!
On line 21, we move the image by the number of pixels specified by "speed" using the rect object method move_ip(); the letters "ip" are short for "in place", meaning that we reuse the same rect object. (A second similar method that can be used, move() creates a new object instead.)
The larger the values of "speed", the faster the image will appear to move on the screen.
On line 22 we pause the program for 100 milliseconds, or 0.1 second, so that we can see what happens each time we repeat the statements inside the while loop.
The result is an image that appears to be moving ... sort of. Make sure you try it before going any further.
 14
 15 while True:
 16     for event in pygame.event.get():
 17        if event.type == pygame.QUIT:
 18            sys.exit()
 19
 20     # move object
 21     smilie_rect.move_ip(speed)
 22     pygame.time.delay(100)
 23
 24     # update image
 25     screen.blit(smilie, smilie_rect)
 26     pygame.display.flip()
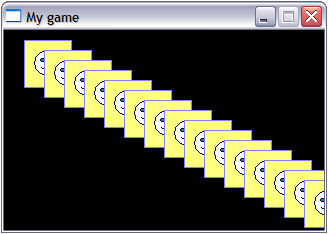
As you should have noticed, the problem is that, rather than moving the image, we keep drawing a new copy on top of the previous image each time it is updated.
In order to make it appear to move, we need to erase it from its original position before we move it to the new position. Since there is nothing else on the screen, we can achieve this effect by redrawing the entire background in black before drawing the image. This is not very efficient but will suffice for this lesson. The changes to make are indicated below.
 13 speed = [20, 10]
 14 black = 0, 0, 0      # RGB values for the colour black

...
 24     # update image
 25     screen.fill(black)
 26     screen.blit(smilie, smilie_rect)
 27     pygame.display.flip()
Rather than having the image move off the screen, we are interested in having it "bounce" inside. To do so, we need to learn a bit more about images geometry.
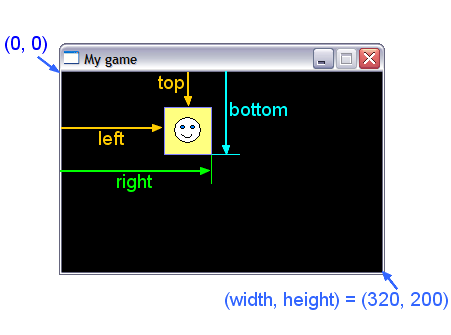
When we create a "rect" using the get_rect() method, many image attributes get calculated. The more interesting for us are the following four: left, right, up, bottom, which correspond to the location of the edges of the image (in pixels) as they appear on the screen. This is illustrated below.
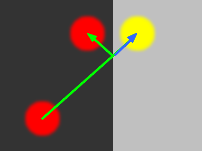
Now, suppose that the image (smilie) is moving horizontally towards the right. In order to have it "bounce" on the right edge of the screen window, we need to reverse its direction of motion when its right edge (smilie_rect.right) goes beyond the screen boundary location in that direction (width). To reverse the direction of motion, we change the sign of the "speed" variable. To do things "perfectly", we should calculate how far beyond the boundary we have moved (too_far = smilie_rect.right - width) and reset the position of the image to reflect properly the "bounce" (smilie_rect.right = width - too_far). A visual example showing both the image moved beyond the screen edge (in yellow) and the properly "bounced" image (in red) is provided below.
We will not bother doing this readjustment in this lesson (however, you might want to do something similar in your own games if you think it's required.) What we will do is to decrease the "speed" (line 13 below) and the time delay between screen updates (line 27 below) so that the image appears to move more smoothly on the screen. With a smaller "speed", the amount of adjustment needed to make the bounce "look right" becomes essentially negligible.
At the same time, we introduce the "speed reversal" needed at each of the four edges of the screen window (lines 23 to 26).
 13 speed = [2, 1]
...
 21     # move object
 22     smilie_rect.move_ip(speed)
 23     if smilie_rect.left < 0 or smilie_rect.right > width:
 24         speed[0] = -speed[0]
 25     if smilie_rect.top < 0 or smilie_rect.bottom > height:
 26         speed[1] = -speed[1]
 27     pygame.time.delay(10)
 28
 29     # update image
 30     screen.fill(black)
 31     screen.blit(smilie, smilie_rect)
 32     pygame.display.flip()
Now that we have seen how to move a square or rectangular image, you might be interested in having a non-rectangular image, such as the circular smilie with no background, move on the screen. This is not exactly possible: pygame only deals with rectangular images. However, do not despair as there is a workaround. What you can do is tell pygame to treat a given colour (yellow for our smilie) as though it were transparent. The following fragment of code does just that.
 15 black = 0, 0, 0
 16
 17 smilie = smilie.convert()
 18 colorkey = smilie.get_at((1,1))
 19 smilie.set_colorkey(colorkey, pygame.RLEACCEL)
 20
 21 while True:
...
The get_at() method tells pygame to read the colour of the pixel at the specified location. Most often, this will be chosen to be the pixel at (0, 0). However, in our case, we drew the smilie with a blue border on a yellow background. The pixel located at (0, 0) is blue; the one at (1, 1) is yellow. The constant pygame.RLEACCEL in the set_colorkey() method instructs pygame to process [compile] the resulting image taking into account the transparency color so that it will be blitted faster in the future.
While setting the transparency colour gives the impression of non-rectangular shapes, it still does not make the image (smilie) appear to bounce off its circular edges. To do that, we need to compensate for the distances between the image of interest and the edges of the rectangular region. For our smilie, the relevant distances (in pixels) are as follows:
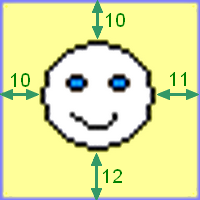
We can then make the image appear to bounce off the circular edges by making the following changes:
 27     # move object
 28     smilie_rect.move_ip(speed)
 29     if smilie_rect.left + 10 < -0 or smilie_rect.right - 11 > width:
 30         speed[0] = -speed[0]
 31     if smilie_rect.top + 10 < -0 or smilie_rect.bottom - 12 > height:
 32         speed[1] = -speed[1]
The complete listing for the bouncing smilie program is as follows:
  1 import sys
  2 import pygame
  3
  4 pygame.init()
  5
  6 size = width, height = 320, 200
  7 screen = pygame.display.set_mode(size)
  8 window_title = "My game"
  9 pygame.display.set_caption(window_title)
 10
 11 smilie = pygame.image.load("smilie.bmp")
 12 smilie_rect = smilie.get_rect()
 13 speed = [2, 1]
 14 black = 0, 0, 0
 15
 16 smilie = smilie.convert()
 17 colorkey = smilie.get_at((1,1))
 18 smilie.set_colorkey(colorkey, pygame.RLEACCEL)
 19
 20 while True:
 21     for event in pygame.event.get():
 22        if event.type == pygame.QUIT:
 23            sys.exit()
 24
 25     # move object
 26     smilie_rect.move_ip(speed)
 27     if smilie_rect.left + 10 < 0 or smilie_rect.right - 11 > width:
 28         speed[0] = -speed[0]
 29     if smilie_rect.top + 10 < 0 or smilie_rect.bottom - 12 > height:
 30         speed[1] = -speed[1]
 31     pygame.time.delay(10)
 32
 33     # update image
 34     screen.fill(black)
 35     screen.blit(smilie, smilie_rect)
 36     pygame.display.flip()
A copy of this program can be found here. This completes our introduction to moving objects on the screen using pygame. Next lesson: Organizing the code