So far, our programs have included only one object. What kind of complications can we expect if we add a second object? To find the answer to that question, please read on.
We will first start by adding a stationary object at the center of the screen. To do so, we only need to add 8 lines of code (including two comments) to our last example. We start by loading an existing image with no transparent colour (line 30).
...
 24 def init_images():
 25     global speed, smilie, smilie_rect, background_colour
 26     global speed_up, speed_down, speed_left, speed_right, zero_speed
 27     smilie, smilie_rect = load_image("smilie.bmp", colorkey_pixel = (1, 1))
 28     # new object "block"
 29     global block, block_rect
 30     block, block_rect = load_image("smilie.bmp")
The next step is to position the image at the centre of the screen. When we create the "rect" for the image, the top left corner is taken to be at position (0, 0), so that
rect.top = 0 and rect.left = 0. The centre of the image is taken to be at position (rect.centerx, rect.centery). If we attempt to position the image at the centre of the screen [at (width/2, height/2)] by moving it using
rect.move_ip(width/2, height/2), we will find that the top left corner of the image is located at the centre of the screen; this is not what we want.

What we need to do is shift back the image by the initial position of its centre; this is done by lines 32, 33, and 34 below.
 31     # position "block" at center of the screen
 32     x = width/2 - block_rect.centerx
 33     y = height/2 - block_rect.centery
 34     block_rect.move_ip(x, y)
 35     # "speed" for horizontal and vertical motion only
 36     step_size = 10
Finally, the last thing to do is to blit the image onto the screen (line 81 below) before displaying it.
 78 def update_display():
 79     pygame.time.delay(10)
 80     screen.fill(background_colour)
 81     screen.blit(block, block_rect)
 82     screen.blit(smilie, smilie_rect)
 83     pygame.display.flip()
Make these changes and try the new program, making the "transparent" image move around.
If you have tried the new program, you most certainly have noticed that the images can overlap, as illustrated below.

This is likely not what we want. What we will do is to make it appear as though the stationary smilie is "hard" so that the moving smilie can not penetrate it.
Important: we will assume that the moving object will move slowly enough so that it could not go to the other side of the non-moving object in a single step. (Unless we say otherwise, we will continue to assume in subsequent lessons that, even for two moving objects, the speed of motion will be slow enough that they could never move a combined length greater than their size in a single step.)
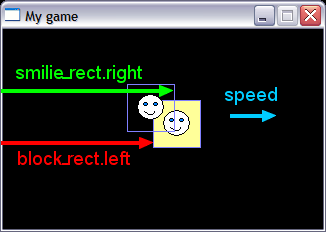
Let's consider a concrete example. Suppose our moving smilie is moving from left to right with a speed of [0, 20] and that the last step has caused it to overlap the non-moving "block".

What we want to do is bring it backwards (to the left) until its right edge is flush with the left edge of the non-moving block. We thus want to make it move by
block_rect.left - smilie_rect.right
which is a negative amount (thus to the left) in the horizontal direction.
In order to determine if two "rects" (A and B) overlap, pygame provide a useful function:
A.colliderect(B)which return True if there is an overlap.
Thus the code needed to move the smilie back to the left in our example would be:
if smilie_rect.colliderect(block_rect):
    if speed == speed_right:
        smilie_rect.move_ip([block_rect.left - smilie_rect.right, 0])
The complete code changes, taking into account all four possible directions of motion, are given below:
 65 def move_objects():
 66     global smilie_rect, block_rect, speed
 67     global speed_up, speed_down, speed_left, speed_right, zero_speed
 68     smilie_rect.move_ip(speed)
 69     if smilie_rect.left < 0:
 70         smilie_rect.move_ip([-smilie_rect.left, 0])
 71     if smilie_rect.right > width:
 72         smilie_rect.move_ip([-smilie_rect.right+width, 0])
 73     if smilie_rect.top < 0:
 74         smilie_rect.move_ip([0, -smilie_rect.top])
 75     if smilie_rect.bottom > height:
 76         smilie_rect.move_ip([0, -smilie_rect.bottom+height])
 77     # checking for collisions, and moving "smilie" back to the edge of "block"
 78     if smilie_rect.colliderect(block_rect):
 79         if speed == speed_down:
 80             smilie_rect.move_ip([0, block_rect.top - smilie_rect.bottom])
 81         elif speed == speed_up:
 82             smilie_rect.move_ip([0, block_rect.bottom - smilie_rect.top])
 83         elif speed == speed_left:
 84             smilie_rect.move_ip([block_rect.right - smilie_rect.left, 0])
 85         elif speed == speed_right:
 86             smilie_rect.move_ip([block_rect.left - smilie_rect.right, 0])
 87     speed = zero_speed
 88
If you need it, a copy of this new version of the program can be found here