In this lesson, we will learn how to control the movement of our image using the keyboard. Our starting point is the program listed at the end of the previous lesson. As usual, we will indicate changes by writing the line number in a colour other than grey.
The first change we make is to import many constants defined by pygame; these constants are written in CAPITAL letters. By importing these values, we do not need to precede them by "pygame.".
  1 import sys
  2 import pygame
  3 from pygame.locals import *
...
 21         image.set_colorkey(colorkey, RLEACCEL)
Next, we will introduce a basic step size (2 pixels) and five "speed" values corresponding to motion in the horizontal or vertical direction, as well as no motion at all (zero_speed).
 24 def init_images():
 25     global speed, smilie, smilie_rect, background_colour
 26     global speed_up, speed_down, speed_left, speed_right, zero_speed
 27     smilie, smilie_rect = load_image("smilie.bmp", colorkey_pixel = (1, 1))
 28     # "speed" for horizontal and vertical motion only
 29     step_size = 2
 30     speed_up = [0, -step_size] # up on the screen correspond to decreasing y-values
 31     speed_down = [0, step_size]
 32     speed_left = [-step_size, 0]
 33     speed_right = [step_size, 0]
 34     zero_speed = [0, 0]
 35     speed = zero_speed
 36     background_colour = 0, 0, 0
The next change to perform is to add a way for the user to give input through the keyboard. When a key on the keybord is pressed, a keyboard event of type KEYDOWN is generated. The identity of the key that has been pressed can be obtained from the value of event.key. We will only process key events for the four arrow keys (not those on the numeric keypad). The constants defined by pygame for these four arrow keys are: K_UP, K_DOWN, K_LEFT, K_RIGHT. The required changes to the program are noted below, identified as usual by red line numbers.
 38 def process_input():
 39     global speed
 40     for event in pygame.event.get():
 41         if event.type == QUIT:
 42            sys.exit()
 43         elif event.type == KEYDOWN:
 44             if event.key == K_LEFT:
 45                 speed = speed_left
 46             elif event.key == K_RIGHT:
 47                 speed = speed_right
 48             elif event.key == K_UP:
 49                 speed = speed_up
 50             elif event.key == K_DOWN:
 51                 speed = speed_down
The last change we need to make is to the move_objects() function. The simplest form it can take is the following:
 52
 53 def move_objects():
 54     global smilie_rect, speed
 55     smilie_rect.move_ip(speed)
That's it! Try it out for a while, before continuing this lesson.
With the changes introduced above, the image never stops moving once it is set in motion. Furthermore, it keeps on moving beyond the window boundaries. While this type of behaviour may be desired in some games, it is not always desireable in others.
Let us re-introduce the boundaries by moving the image so that is flush with the window's edges if it happens to have moved beyond it.
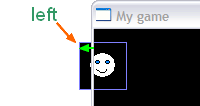
Suppose the smilie image has moved too far too the left; in this case, its left edge (smilie_rect.left) will have a value less than zero. We need to move it back to the right by a similar amount:
smilie_rect.move_ip([-smilie_rect.left, 0])
We can proceed in a similar fashion for all four directions. The result is as follows.
 53 def move_objects():
 54     global smilie_rect, speed
 55     smilie_rect.move_ip(speed)
 56     if smilie_rect.left < 0:
 57         smilie_rect.move_ip([-smilie_rect.left, 0])
 58     elif smilie_rect.right > width:
 59         smilie_rect.move_ip([-smilie_rect.right+width, 0])
 60     elif smilie_rect.top < 0:
 61         smilie_rect.move_ip([0, -smilie_rect.top])
 62     elif smilie_rect.bottom > height:
 63         smilie_rect.move_ip([0, -smilie_rect.bottom+height])
 64
If you desire, you can change this code so that the circular part of the "smilie" rather than its rectangular "box" will stop at the window's edges.
Try it!
In some games, we want to have the image/object move one step each time a key is pressed, rather than continuing to move. One way to do this is to set a flag each time a key is pressed down, processing the key input only when the flag is set correctly (see lines 38, 40, 45, 54 below). The flag is reset when the key is released (lines 55 and 56). The lines with the blue line numbers (46 to 53) have only changed their indentation levels, to be part of a new if statement
.38 key_released = True 39 def process_input(): 40 global speed, key_released 41 for event in pygame.event.get(): 42 if event.type == QUIT: 43 sys.exit() 44 elif event.type == KEYDOWN: 45 if key_released: 46 if event.key == K_LEFT: 47 speed = speed_left 48 elif event.key == K_RIGHT: 49 speed = speed_right 50 elif event.key == K_UP: 51 speed = speed_up 52 elif event.key == K_DOWN: 53 speed = speed_down 54 key_released = False 55 elif event.type == KEYUP: 56 key_released = True
In addition, we need to set the speed to zero after completing one move, otherwise the object will keep moving at the same speed, at least for a while: the while loop loops over more than once in the time it takes to press and release a given key on the keyboard.
 58 def move_objects():
 59     global smilie_rect, speed
 60     smilie_rect.move_ip(speed)
...
 69     speed = zero_speed
That's it! Try it out! You might want to set the stepsize to a value larger than 2.
If you need it, a copy of this new version can be found here. Next lesson: Adding a second object